Technion Athena (GPU) Cluster – Users Manual
-
Introduction
The Technion DGX cluster is a cluster of 9 DGX Nodes, each containing 8 GPU cards. The GPU cards are Nvidia A100 cards, Tensor core GPUS that are among the most advanced cards in existence today.
All Technion researchers can use the DGX cluster’s computational resources, which are allocated depending on availability.
-
-
Pricing
-
The use of the DGX cluster is charged per GPU per hour, as listed here. A monthly bill is sent to the user every month. Currently, storage is not being charged for, but this will change in the future.
-
-
Support
-
Any questions about the DGX, incidents and requests can be submitted through the Sys Aid Portal. Please fill in the categories as seen in the following picture. Please be as informative as possible, explaining what you tried to do and what kind of error message you received. Please read this manual fully before contacting support. The answer might be here. You can also ask and answer questions in the DGX cluster forum.

-
Getting started
-
Registration
-
The first step towards using the DGX cluster is registration through the HPC account request page. Please fill in your details carefully. Under your affiliations, please fill in “DGX users”. A confirmation email will be sent after your HPC account is created.
-
-
Accessing Your Folder
-
Along with the account, you will get a folder in the DGX master node, a server with an available space of 400 GB, this folder will be the “home base” for running all your computations in the DGX cluster. The folder can be accessed from any computer connected to the Technion network. This means either a computer physically connected to a LAN port in the Technion, a computer connected to a password protected Technion Wi-Fi network (not techpublic) or a computer connected to the Technion VPN.
-
-
-
Linux users
-
-
After registration, Linux and Mac users can access the cluster through:
ssh “username”@dgx-master.technion.ac.il
For example:
ssh nathan-blanc@dgx-master.technion.ac.il
When a password is requested, type your Technion account password (the same as in your email).
-
-
-
Windows users
-
-
Windows users should download two programs to access the cluster conveniently. MobaXterm is a Linux emulator that will enable you to run your computations, and WinSCP can be used for transferring files from your computer to your home folder
-
-
-
-
Using MobaXterm
-
-
-
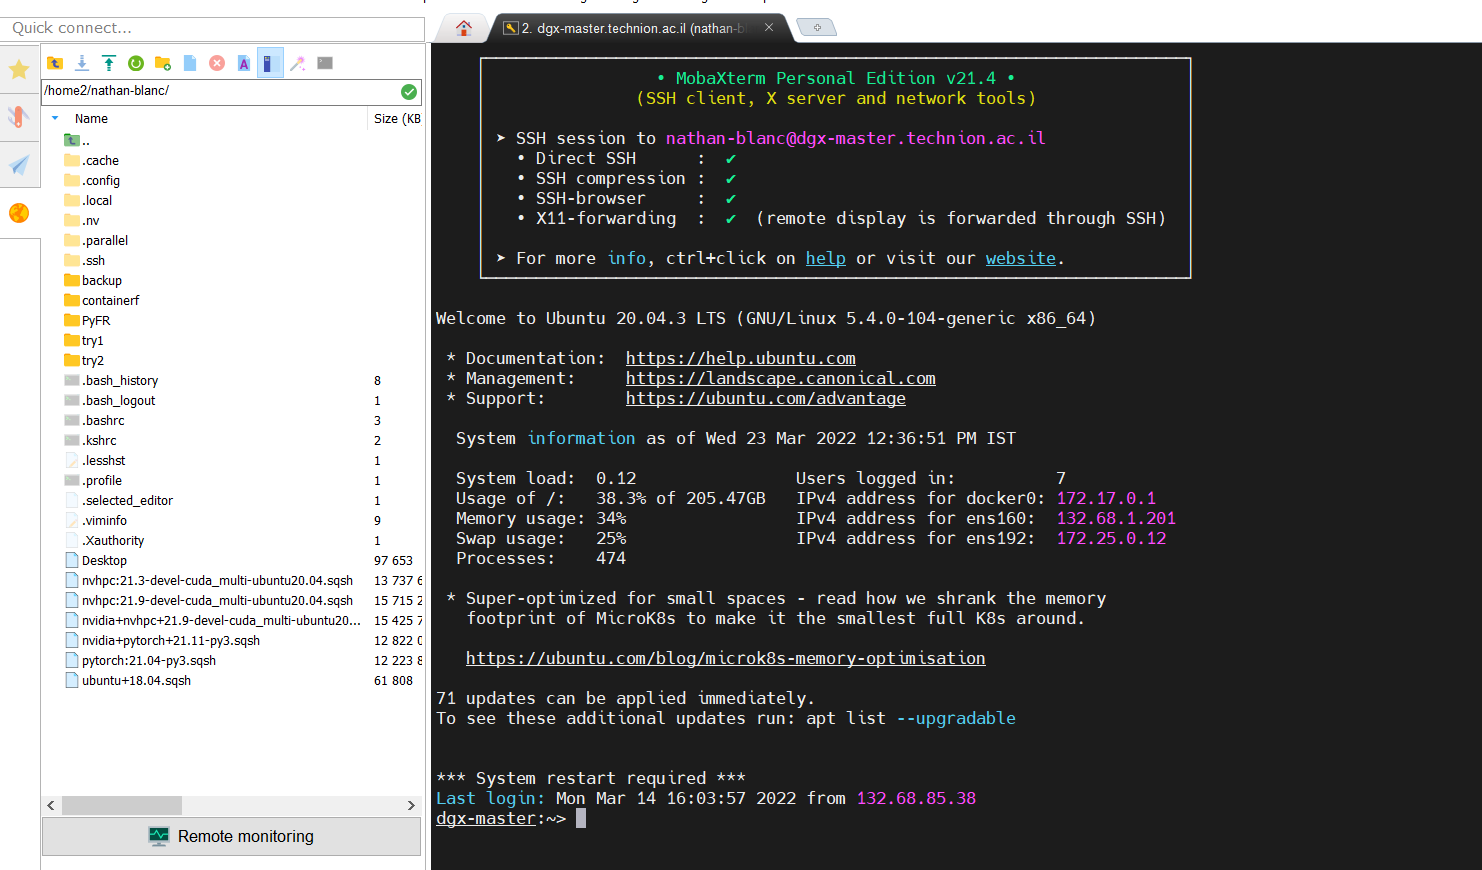
After downloading and installing MobaXterm, you can start by selecting “session” and then “SSH” as can be seen in the following picture. You can then fill in the details in the appropriate cells. Under “Remote Host” fill in “dgx-master.technion.ac.il”. Tick in the “specify username” box and fill in your Technion username (the same as in your email address). Specify port 22.

After clicking OK, a DGX session is created. You then have access to a linux terminal (on the right) and a file navigator (on the left). You can use either the terminal or the navigator for moving downloading, uploading and editing files, but any runs on the DGX nodes should be run through the linux terminal as described in the next sections.
-
-
-
-
Using WinSCP
-
-
-
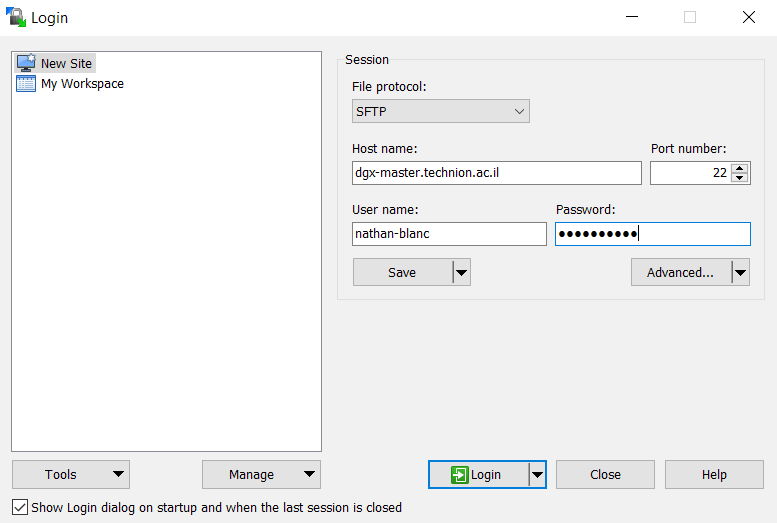
WinSCP is used to transfer files more conveniently than mobaxterm, from your computer to the DGX home folder and vice versa. When you open the application, start a new session, and then fill in the details as can be seen in the following picture. Under Host name write down dgx-master.technion.ac.il, under Port number write 22 and under User name and Password write down your Technion username and password. After logging in, the file transfer is straight-forward.
-
Building and using your container
All of the computations on the DGX cluster are run using docker containers– packages of applications, code and files that form a “virtual environment”. This ensures that all required software packages and programs will be accessible to the GPU, no matter which node or card you run on. The standard procedure for working with the cluster is to download an existing container, modify it according to your needs and the use it for all your runs.
-
-
Finding a Container
-
You can search the NGC catalogue to find a Container suitable for you needs. The Tensorflow and PyTorch Containers are often suitable for AI applications. If you can’t find a suitable container, this container might be a good one to start with.
-
-
Downloading a Container
-
To download a container, you must first get the “pull tag” from the container in the catalog, as can be seen in the following picture.

Notice: Containers frameworks (Docker/enroot/Singularity) downloads container images in layers, then constructing the container image.
Layers are intermediate stages of containers construction, they are stored in some intermediate files on /tmp folder by default. This is
considered bad practice since /tmp folder quota will be full soon. to prevent it use TMPDIR environment variable to redirect intermediate files
to an arbitrary folder of your choice. Use it as follows:
export TMPDIR=”/home/<user name>/work/tmp/”;
This setting must take place before the “docker pull” / “enroot import” instructions. your user name should replace the <user name> section.
This will copy to your clipboard a command of the form:
docker pull nvcr.io/nvidia/”container address”
For example, in the case of the TensorFlow container displayed in the picture the command is:
docker pull nvcr.io/nvidia/tensorflow:22.02-tf2-py3
To download the container you should then take the following steps:
-
-
-
- Replace the “/” sign after Nvidia with a “#”
- Add “docker://” before the nvcr
- Replace “docker pull” in the command with “enroot import”
- Run the command in the dgx ssh terminal
-
-
For example, in the TensorFlow example from above, you should enter the command:
enroot import docker://nvcr.io#nvidia/tensorflow:22.02-tf2-py3
In case of a simple container, please enter:
enroot import docker://ubuntu
In your terminal. The download will then begin but might take a while, please be patient. The container will eventually be downloaded as a *.sqsh file in your working directory.
-
-
Modifying a container
-
The container can be edited (inspected and modified) by running it interactively, introducing changes and then saving the state.
Usually, such a run should be executed on the MIG partition.
You should execute the following command to run the container interactively :
srun -p mig -G 1 --container-image=”path to container” --container-save=”path where container is to be saved” --pty bash
However, when all resources of the mig partition are already in use, you can alternate the job to one of the two partitions work / mig .
Thus, container editing will start on available resource from one of the partitions:
srun -p mig,work -G 1 --container-image=”path to container” --container-save=”path where container is to be saved” --pty bash
For example, if you downloaded a container and saved it as “mycontainer.sqsh”, you should type in:
srun -p mig -G 1 --container-image=~/mycontainer.sqsh --container-save=~/mycontainer2.sqsh --pty bash
A bash session will be opened, where you can install required packages (for example, by installing packages using pip), and run test scripts.
You can navigate to your home folder in order to use your files to make sure that everything is running properly.
After you finish your investigation, type “exit” to terminate the run.
The container will then be saved in the save path you specified.
-
-
Testing a container on multiple GPUS
-
If you want to test a container interactively on multiple GPUs, simply run the container with -G and a different number, without saving the state.
srun -p mig[,work] -G “n” --container-image=”path to container” --pty bash
Where n is the number of GPUS that you are running on.
-
Running a job
All the computations on the DGX cluster are run via the Slurm Workload manager, which is essentially a job scheduling system. You can run the command “squeue” to see the current queue, who is running and on which nodes. See “important commands” at the ends of the manual for more details.
-
-
Batch files
-
During the testing phase only, you should run bash via the srun command as described in the previous section. Once the container is ready and tested though, you should run commands only by building job files, and running them using the sbatch command.
Job files consist of two parts, the slurm commands which are input as comments at the top, and the actual code. See details about both in the following paragraphs. The file can be written as a text file in unix format, and saved with a .job extension. They can be later executed by navigating to the directory, and executing sbatch.
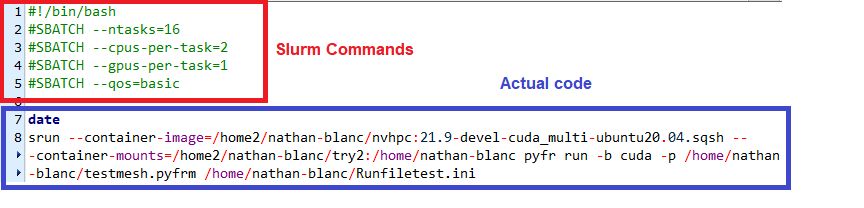
You can work with the following code and modify it:
#!/bin/bash

#SBATCH --ntasks=1

#SBATCH --cpus=32

#SBATCH --gpus=4

#SBATCH --qos=basic

srun --container-image=/home2/nathan-blanc/nvidia+pytorch+22.03-py3.sqsh --container-mounts=/home2/nathan-blanc/try2:/home/nathan-blanc printf "Hello, World!"
To submit the job to the batch, type:
sbatch example.job
-
-
Slurm commands
-
All the slurm commands should be put at the top of the file, with the format:
#SBATCH --“command”
For example:
#SBATCH --ntasks=16
The important commands:
–qos select –qos=basic for running a basic run and –qos=normal for running a normal run. See the subsection “Types of runs” for details about the difference
–ntasks number of tasks in the run. In general should be equal to the number of GPU’s that you are requesting. However, if you are using MPI it should simply be equal to 1.
–gpus the number of gpus requested for the job
–cpus the number of cpus requested for the job
–mem the amount of memory (RAM) requested for the job
Additional commands can be found in the slurm documentation page for srun. If you want to run on the the MIG partition (meaning running with a third of the resources at a third of the cost) you can add –partition=mig to the commands.
-
-
The Actual code
-
The actual code can include a few lines to check the run (e.g a “date” command to log the runtime or a nvidia-smi command to check which GPUS are used). However, the actual code should be run via a single srun command.
srun --container-image=”path to container” --container-mounts=”path to folder being mounted”:”path inside container” ”command”
-
-
-
Mounting folders
-
-
When running batch mode, it is inadvisable to navigate between directories. Instead, mount the necessary folders on to the containers, by specifying their path in your folder, and then the path inside the container. When you submit the job, the folder will be accessible to the container via the new path specified by you.
-
-
Import container from DockerHub to file:
# If you are not running in bash – enter to shell by run the command “bash” before running the script
# Please verify a valid tag of the container in DockerHub
(ubuntu for example: https://hub.docker.com/_/ubuntu?tab=tags&page=1&ordering=last_updated)
enroot import docker://ubuntu
# Please be patient while the script importing the container for the first time.
# You can only pull from PUBLIC Repos only.
Create the container image:
enroot create --name ubuntu ubuntu.sqsh
Edit the container files:
srun -p mig -G 1 --container-image=$HOME/ubuntu.sqsh --container-save=$HOME/ubuntu.sqsh --pty bash
-
Types of runs (basic vs normal)
There are two types of runs you can run using the batch mode- basic runs and normal runs. Normal runs are pushed ahead of basic ones in the queue, but are allocated less resources, as can be seen in the following table.
Run type
–qos=
Priority in
queue
Time
limit
GPU
resources limit
CPU
resources limit
Memory resources
limit
normal
higher
24 H
8
256
960
basic
lower
24 H
16
512
1920
-
Resubmit a job automatically using job arrays:
-
To resubmit a job automatically, please see the link.
-
Tracking your job
Once your job is running, you can use squeue to see its current status. This will tell you if it has started running, on which node(s), and the time it has been running. In addition, a log file will be created with all the outputs from your run. You can also check your previous runs by using the sacct command.
-
-
GPU Utilization
-
You can view the utilization of all the dgx cards in all the nodes here. Combined with the squeue command, this allows you to know how well your GPU cards are utilized. To access the link, you need to be connected to a Technion network. means either a computer physically connected to a LAN port in the Technion, a computer connected to a password protected Technion Wi-Fi network (not techpublic) or a computer connected to the Technion VPN.
-
Important Commands
A list of basic linux commands can be found here. Some additional important commands specific for our purposes are listed here. Many of them are also referred to in other parts of the manual:
-
- squeue displays the current queue of all running jobs, including the user, the status, the time since the run began and additional parameters
- srun starts a job running in interactive mode.
- sbatch submits a run for a batch job. See section 4 for details.
- nvidia-smi when running in interactive mode, this command can be used to get elaborate data regarding your cards, including utilization and electricity consumption.
- sacct –check your run history
More useful links options:
Technical References
Examples for SLURM container support by Enroot
container-mounts
conatiner-save
Enroot usage
Pre-SLURM tutorial
Multi-Node Tutorial