Division of Computing and Information Systems
Division of Computing |and Information Systems
  • Services
    • Backup and Restore
      • Backup Policy
      • Joining and Installation
      • Restoring data from backup
      • Mailbox Backup
    • Cloud Computing Services
      • Office 365
        • SharePoint Online
        • Central email at the Technion – Cloud services Office 365
      • Microsoft Azure Service
      • Video Conference service using Zoom software
    • Communication Services
    • High Performance Computing (HPC)
      • HPC Services
        • Zeus CPU Cluster
        • Zeus DGX Cluster
      • HPC Resources
        • CPUs (Zeus) – Utilization Graphs
        • GPUs (Zeus) – Utilization Graphs
        • Active Table
      • HPC Documentation
        • Work procedure
        • Accounts
      • HPC Support
      • HPC Rates & Billing
      • HPC Software
        • Zeus Cluster Supported Software
      • IUCC HPC Cloud
    • Monitoring
    • Servers
      • Account Opening Guide for a computer account at the Technion
      • Authentication Services in Central Servers
      • Hosting physical servers
      • Hosting virtual servers
      • Virtualization
        • Server virtualization
        • Azure Virtual Desktop service for students
    • Software
      • Software Catalogue
      • Software Acquisition
      • Microsoft Software Licensing
    • Storage Solutions
      • Central storage
      • OneDrive Cloud Storage
    • Technion Email
      • Central email at the Technion – Cloud services Office 365
      • Mailing Lists
      • FAQ’s
    • SECTIGO Certificate System
  • Support
    • FAQ-Frequently Asked Questions
    • ESS/MSS System – Self-Service for Employees and Managers
    • Training Aids – Miscal Project
    • TeamViewer Installation
    • Remote Desktop Connection
    • Faculty Engineers
    • Macintosh Support
    • Antivirus
  • Information Security
    • User Information
    • Security alerts
    • Safe Surfing
    • Privacy in social networks
    • Password management guide
    • Password Management
    • File Encryption Guide
    • Tips for using Zoom
    • Avoid and report phishing emails
  • About
    • Directions to CIS
    • Contact Us
    • MyCIS
    • People
  • ע
Division of Computing and Information Systems > Services > Communication services > Wireless Communication at the Technion > TechSec > Connecting to TechSec from Windows 11 — manual

Services

  • Central Services
  • CIS Division Price List
  • Communication services
    • Off Campus connection
    • Communication on Campus
    • Communication at the Dormitories
    • Wireless Communication at the Technion
  • Backup and Restore
    • Backup Policy
    • Joining and Installation
    • Restoring data from backup
    • Mailbox Backup
  • Servers
    • Account Opening Guide for a computer account at the Technion
    • Authentication Services in Central Servers
    • Hosting physical servers
    • Hosting virtual servers
    • Virtualization
    • Server virtualization
    • Azure Virtual Desktop service for students
  • High Performance Computing (HPC)
    • Getting Started
    • HPC Services
      • Zeus CPU Cluster
      • Athena GPU Cluster
    • HPC Resources
      • Zeus CPU Utilization Graphs
      • Athena GPU Utilization Graphs
      • Active Table
    • HPC Documentation
      • PBS usage
    • HPC Support
    • HPC Rates & Billing
    • HPC Software
      • Zeus Cluster Supported Software
      • Python on ZEUS under Rocky8
  • Cloud Computing Services
    • IUCC HPC Cloud
    • Microsoft Azure Service
    • Office 365
      • Cloud email services Office 365
      • SharePoint
    • Zoom Video Conference
  • Technion Email
  • Software
  • Storage Solutions
    • Central storage
    • OneDrive Cloud Storage
  • Monitoring

Connecting to TechSec from Windows 11 — manual

Manual configuration of WiFi connection to TechSec for Windows 11

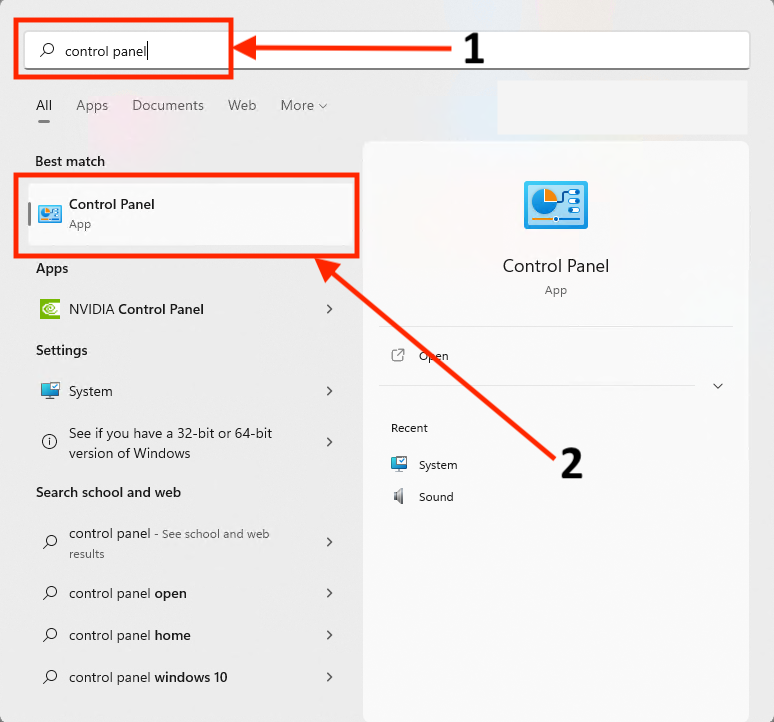
  1. Open legacy Control Panel by searching ‘control panel’ in Windows 11 Search field(1) and then click on Control Panel icon(2):
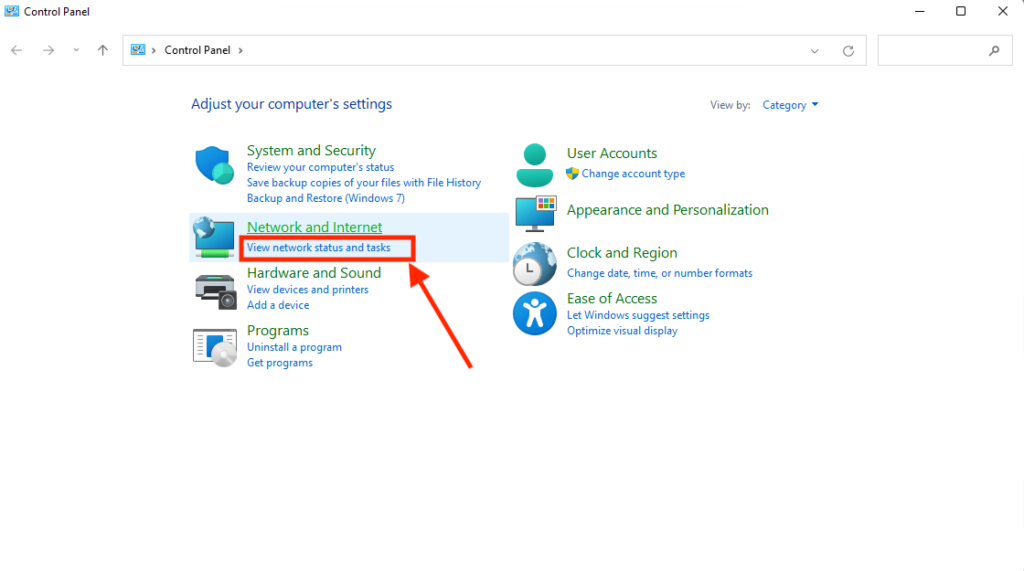
  2. Click on View network status and tasks in Network and Internet section:
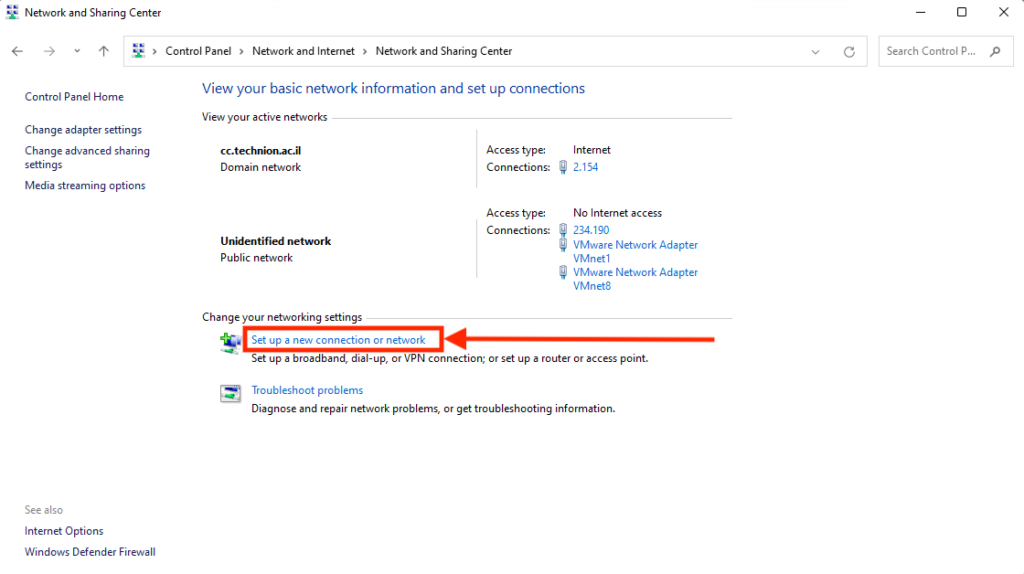
  3. Click on Set up new connection or network:
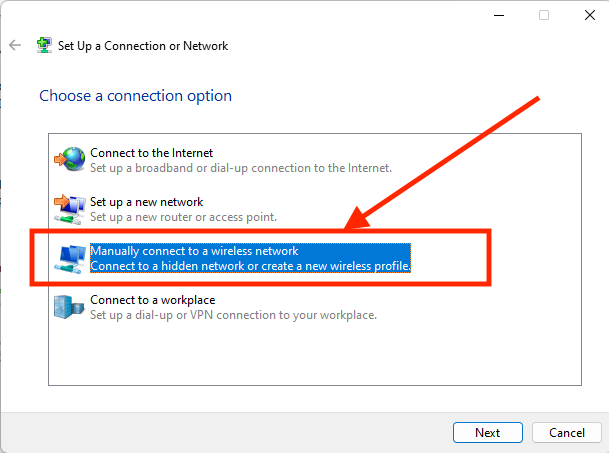
  4. Click on Manually connect to a wireless network:
  5. Fill Network name (TechSec) and choose WPA2-Enterprise from Security type as shown on a screenshot below:
  6. Click on Change connection settings:
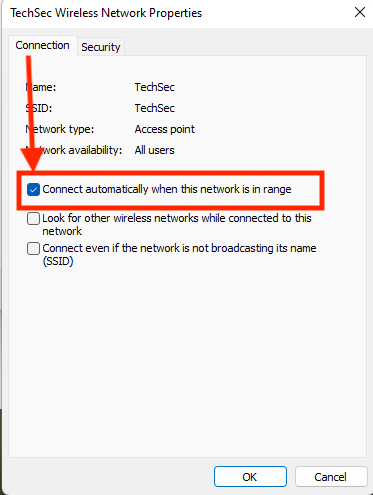
  7. Mark Connect automatically when this network is in range:
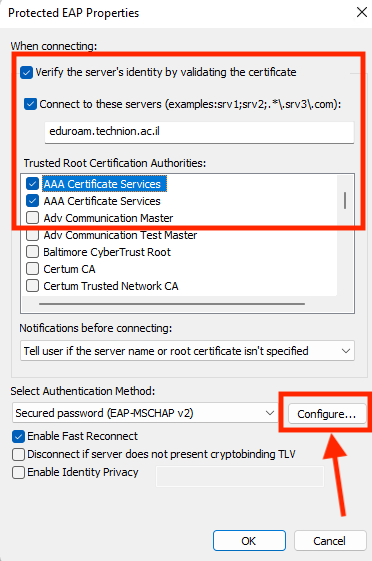
  8. Choose Security tab, configure as shown on a screenshot below and click Settings: 
  9. Configure as shown on a screenshot below and click Configure…:
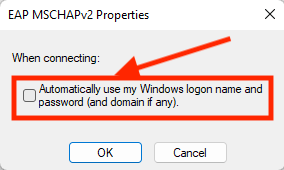
  10. Remove mark as shown below and then click OK:
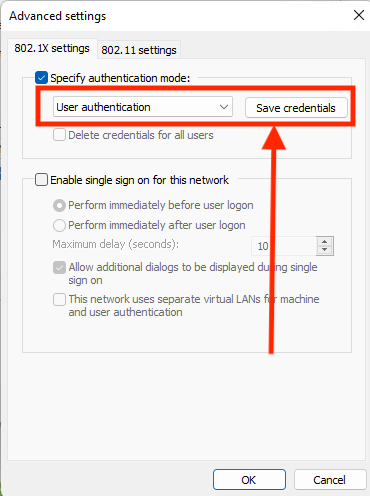
  11. Mark ‘Remember my credentials for the connection …’ and click Advanced settings:
  12. Choose User authentication from Specify authentication mode menu and click Save credentials:
  13. Enter your Technion credentials and click OK:
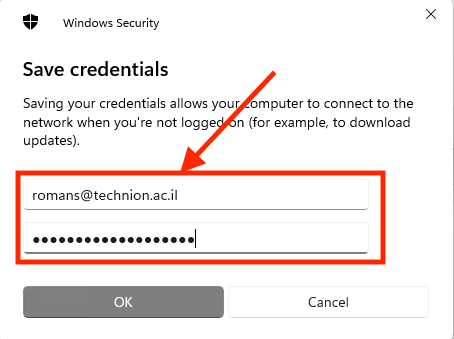
  14. Click OK twice and then Close:
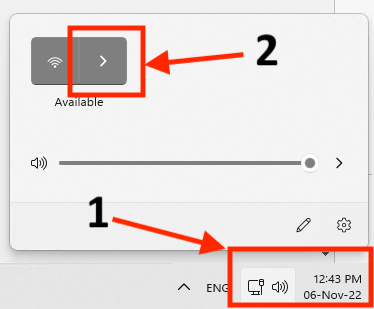
  15. Click on right bottom network/speaker icon(1) and then on arrow icon(2) as shown below:
  16. Mark Connect automatically(1)and then click Connect(2):
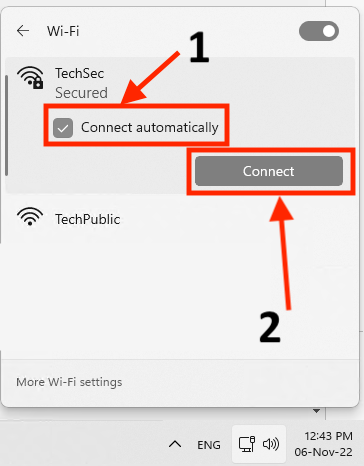
  17. If your credentials were correct and you did all according to this guide your PC must connect to TechSec without any other questions and warnings:
© All rights reserved to Division of Computing and Information Systems
  • Accessibility Statement (heb)
  • Phone Directory
  • Site Map
Font Resize
Accessibility by WAH